About Video Heads
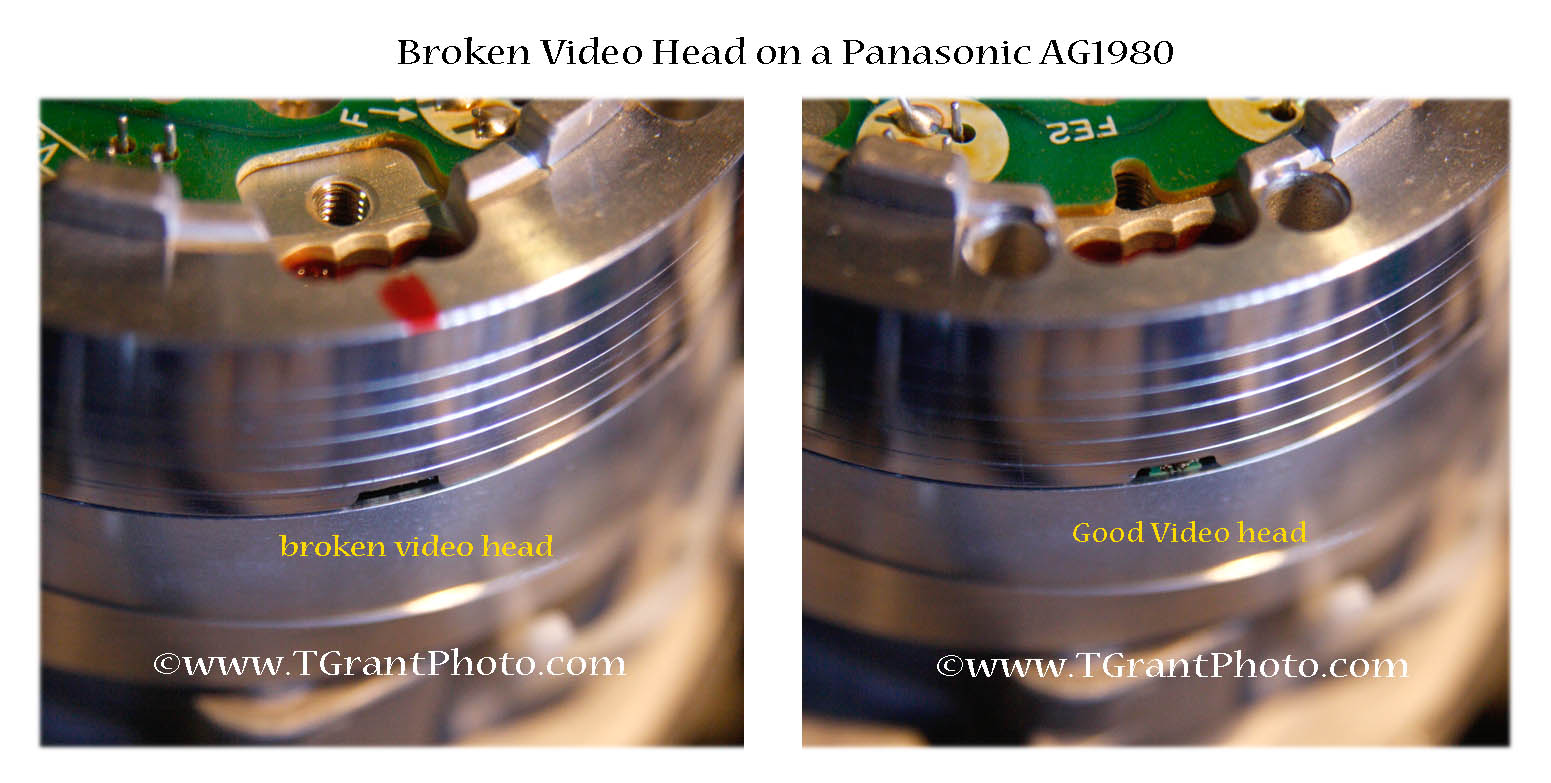
What Does a Broken Video Head Look Like?
Note: This article is for informative purposes only.
We are not responsible for any damages caused by your attempt to clean
your VCR's video heads. Never touch a moving video head drum.
The video head unit is the single most expensive part inside your VCR, so if you clean your video heads yourself please be careful! It's very easy to break or damage the delicate video heads.
Video heads protrude just a little bit from the video drum, just enough to contact the magnetic oxide on the video tape. Over time they wear from continued contact with the tape. New VHS video heads typically protrude 35-45 microns, while 'good' heads usually measure 20 to 30 microns.
When the heads get clogged, the picture looks very snowy. At this point it's easy to get alarmed and start aggressively cleaning the heads. This can lead to damage, as the up-and-down motions with a swab can easily snap off part of the head.

See a large version of this photo here
Signs that your machine may have a clogged or broken video head:
- Your VCR plays SP tapes nicely, but EP/SLP speed tapes look really snowy and jittery
- Your Hi-Fi sound is missing
- In FF search mode you get thick, snowy horizontal bars through the picture
- in the worst instance, there's nothing......just a snowy picture!
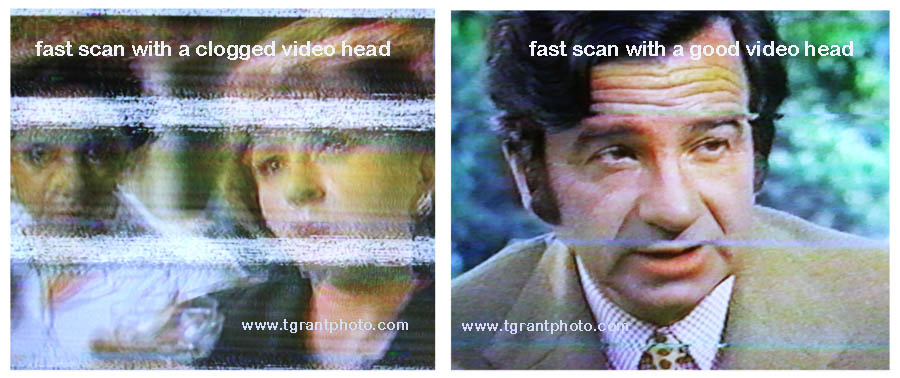
Sometimes, if you have a clogged head, you won't know it until you put the tape into FF Scan mode. Often an extra or "trick" video head is used to make the scan look normal. If this extra head is clogged, you'll see fuzzy horizontal bars when scanning through the tape.
Worn video heads present a different problem. After years of use the video tape wears away at the heads, they don't protrude from the head drum as far as they should. Instead of the typical 25-30 microns, the heads only protrude a little bit, between 5-12 microns. At this point you'll start to see ripples, or waves running through the picture. The only cure for broken or worn video heads is installing a replacement video head unit.
Cleaning Video Heads
Note: This article is for informative purposes only.
We are not responsible for any damages caused by your attempt to clean
your VCR's video heads. Never touch a moving video head drum.
Sometimes simply loading and unloading a tape several times can unclog a video head (the Panasonic AG1980 has an automatic head cleaner that taps the heads every time a tape is threaded). Sometimes running a tape in the fast-forward "scan" mode for a few minutes may also unclog the video head.
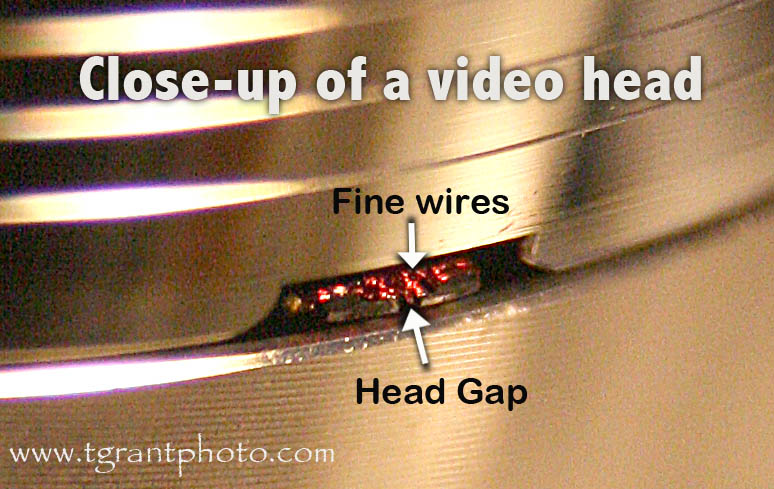
Warning: the following is a dangerous procedure, this may damage or break your video heads (a $500+ part) Never use a Q-tip type swab on the video heads, this can catch the fine wires of the video head and break them. If you don't feel comfortable cleaning your video heads, please contact us for information about our service packages.
Before you start: We don't recommend using "cleaning tapes" as they often use abrasive materials to wear away at the clogged heads. As you can imagine, over time, this also wears down the video heads. Never used "canned air" spray to clean the video heads. The propellant used in these sprays can quickly freeze the delicate video heads and crack them!
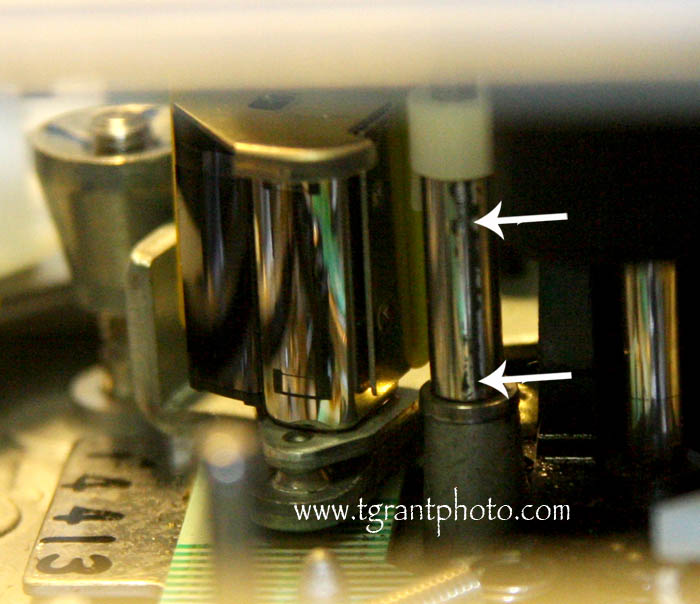
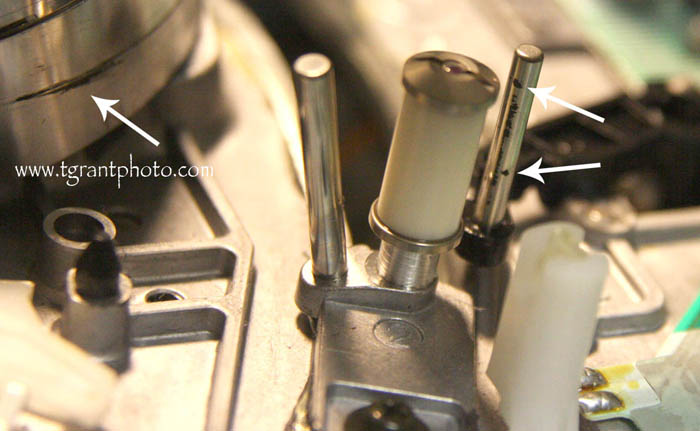
Unplug the VCR and open the lid. Identify the video head drum and gently turn the drum from above so you can become familiar with the location of the video head tips (see photo at the top of the page). Depending on your VCR's model, you might have 2, 4, 5 or 6 video head tips.
In this first step, clean just the tape path. Do not touch the head drum or video heads, we'll get to that in the next step. Begin by carefully cleaning the tape path, linear audio/control head, tape guides, the black rubber pinch roller and the capstan that it presses against. Be careful to avoid the video head tips. Use a good quality swab dipped in 91% or 99% Isopropyl alcohol. Remember, do not touch the video heads with the swab, we'll get to those in the next step.
(above left) The linear audio/control head (above right) tape guide rollers.
While cleaning the linear audio head and the tape guides be on the lookout for black, sticky tape residue. If the residue is stubborn, dampen with alcohol and repeat the process several times until it's removed. Do not use any metal tools to clean the guides or rollers.
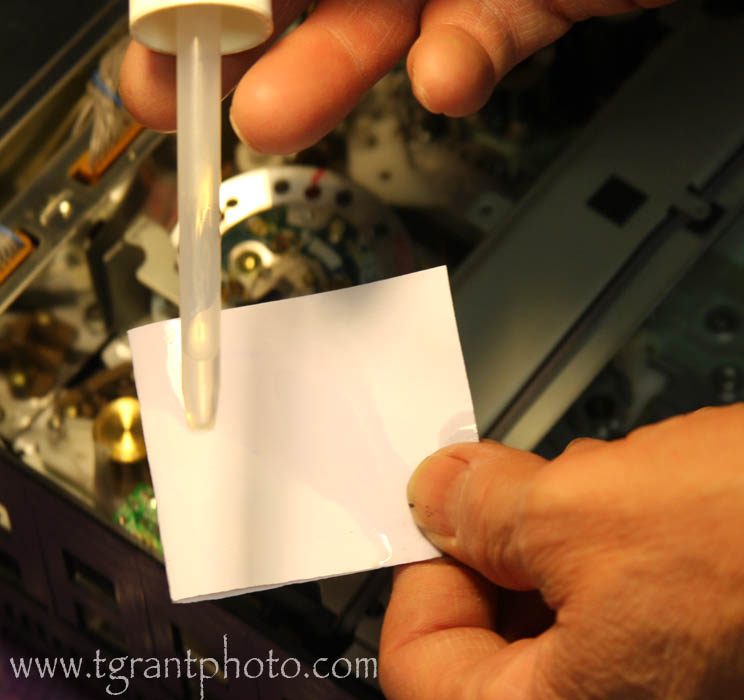
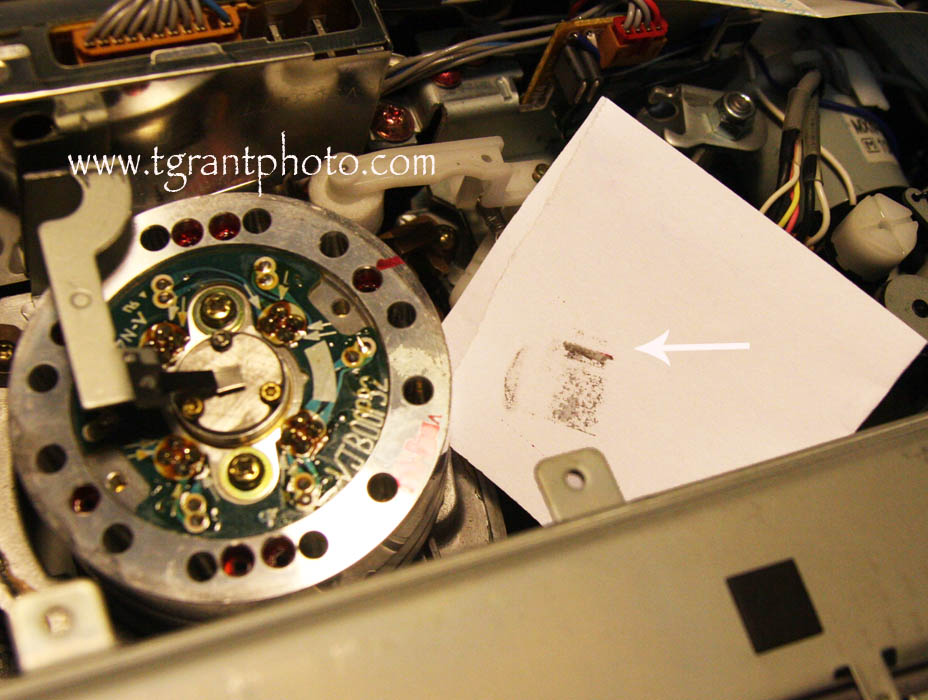
Now for the video heads. Do not use cotton swabs or chamois sticks on the video heads! Get a small piece of white printer paper, about 3" x 6" and fold it over once (it should now be about 3" x 3"). Soak the paper with 91% or 99% Isopropyl Alcohol and blot up the excess. Note: Various video head cleaning tools from the 1980s are not recommended, and may, in fact, damage your video heads.
Gently hold the damp paper with one finger against the side of the head drum. With your other hand, carefully rotate the head drum counterclockwise while applying gentle pressure with one finger, to the damp, alcohol soaked paper.
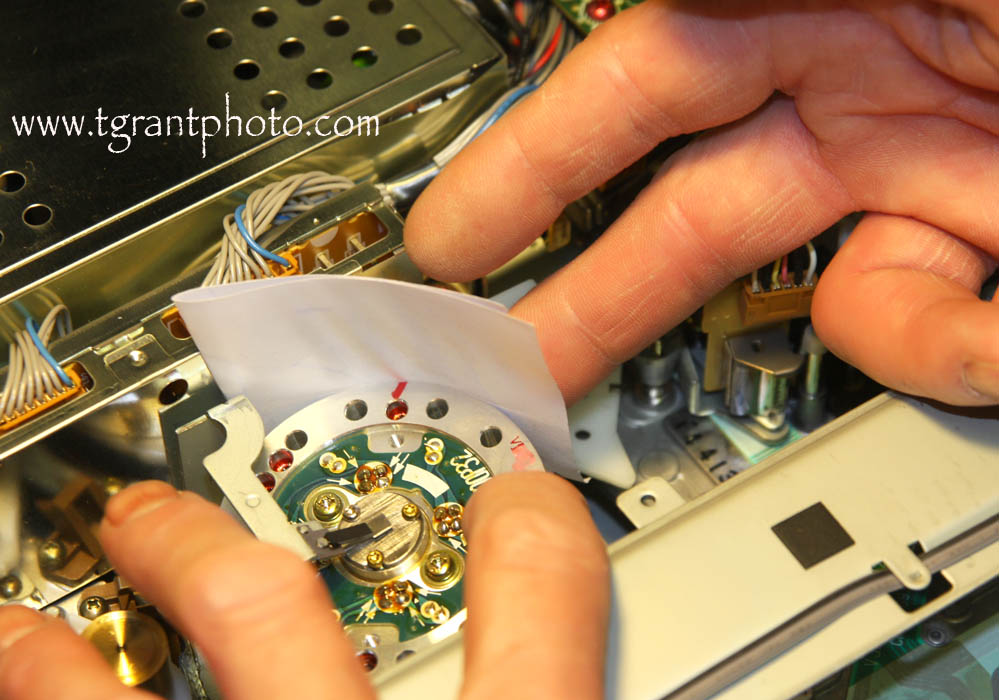
Hold the paper in the center, and make sure that the edge of the paper doesn't catch on the video head tips as they pass by. Do not move the paper, and keep light, gentle, pressure on the paper while slowly turning the video head drum. You should feel a very slight "bump" as the video heads pass under the wet paper. Do not press hard and do not move the paper up or down. Especially avoid moving the cleaning paper vertically as this will damage the video heads.
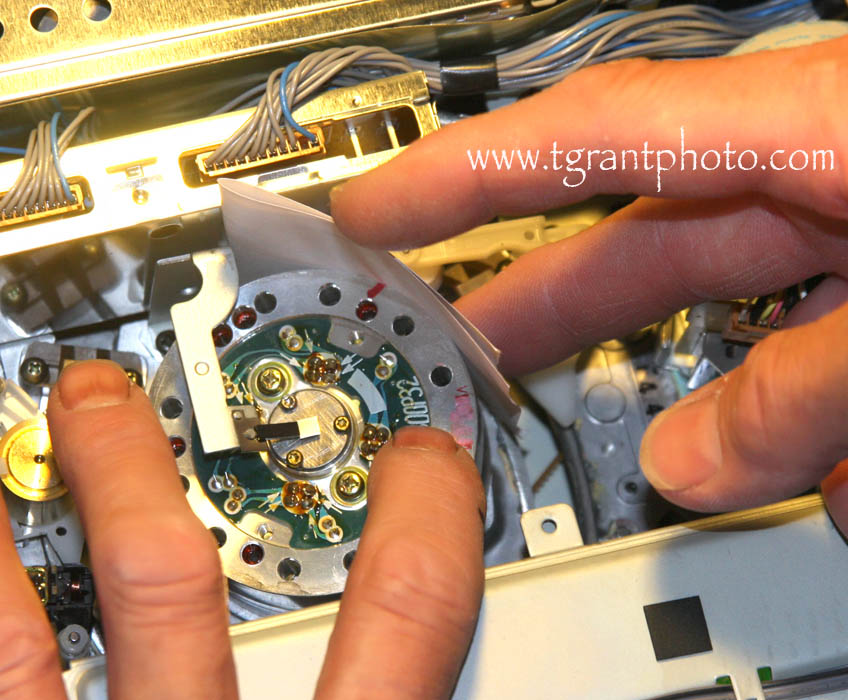
After a few rotations of the head drum you should see a black streak on the paper. In the photo below, the dirty part below the black streak is from gunk on the video head drum. Carefully repeat the process until the paper comes up almost clean.
Sometimes it may take 10-20 strips of alcohol soaked paper strips to properly clean a head, you just have to be patient and keep repeating the process until the paper comes up clean.
Also, you don't want to overlook the four or five circular grooves above the video heads. They're there to provide an air lift to the tape, so it doesn't stick to the video head drum. Very often they're also thoroughly dirty and they can't do their job.
After cleaning it's very important to leave the machine alone for about thirty minutes to allow the isopropyl alcohol to evaporate. If you play a tape too soon, the tape will stick to the wet video head drum and make things even worse!
If you follow the above cleaning tips, your video playback should be nice and clear again!
~ Tom Grant Nov 2013 TGrant Photo LLC
Disclaimer: All the information on this website is published in good faith and for general information purpose only. TGrant Photo LLC does not make any warranties about the completeness, reliability and accuracy of this information. Any action you take upon the information you find on this website (www.tgrantphoto.com), is strictly at your own risk. TGrant Photo LLC will not be liable for any losses and/or damages in connection with the use of our website.
This article is copyright TGrant Photo LLC. Copying or use on another website is prohibited.
We offer complete repair services for the Panasonic AG-1980.